✕
Maintaining accurate thread ring gages is crucial for ensuring the quality and consistency of threaded parts. This article outlines the proper procedure for setting a thread ring to a master setting plug, as recommended by ANSI B1.2 standards.
Setting for a Full Functional Check:
Setting a thread ring to a master setting plug is an established and reliable method for performing a comprehensive functional check of the ring’s ability to meet the intended thread specifications. This process essentially simulates the interaction between the ring and an actual threaded part, providing valuable insights into its functionality. By creating a unique pairing between the ring and the plug, it guarantees a consistent “snug smooth fit” throughout the entire length of the plug. It’s important to remember that a ring set to one specific plug won’t necessarily fit another plug perfectly without readjustment.
Preparing for Setting:
Before beginning the setting process, ensure both the master setting plug and the thread ring gage are thoroughly cleaned and inspected for any nicks or damage. The master plug should be calibrated and meet specific criteria:
- Minimal to no front taper
- Within tolerance
Apply a thin film of light oil to the master plug for lubrication.
The Setting Process:
- Clean and inspect the thread ring gage, removing any sealing wax present.
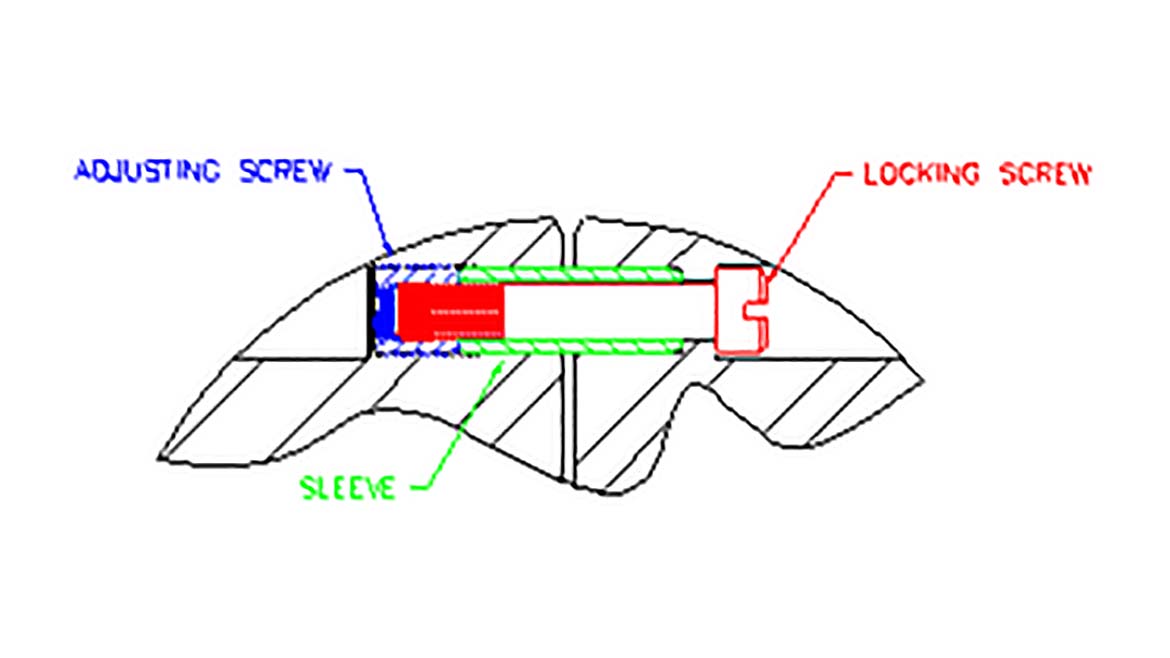
- Loosen the locking screw by turning it counter-clockwise. (see Figure 1)
- Open the ring by turning the adjusting screw clockwise until the master plug can enter freely. (see Figure 1)
- Screw the ring gage onto the full form section of the master plug, ensuring no more than one thread of the ring extends beyond the plug’s last thread.
- Turn the adjusting screw counter-clockwise, while rotating the ring on the plug, until a slight drag is felt.
- Tighten the locking screw. The ring should exhibit a slightly increased drag or “snug fit” compared to the initial feel. This step might require repetition for optimal results.
- With the set plug still inserted, tap the ring gently with a plastic or brass hammer to ensure it’s fully seated. The drag should remain consistent after tapping. If not, repeat step 4.
- Move the ring to the truncated portion (front half) of the master plug (see Figure 2).
- Verify there’s no wobble or shake in the ring. The drag should be similar to the full form section. If there’s wobble, the ring might have worn-out flank angles or lost root relief, requiring further inspection.
- Test for taper or bell mouth by turning the ring onto the truncated section of the master plug by 1.5 to 2 turns. If you do not feel the initial drag and it does not feel snug, but the drag increases as you turn further, this could indicate an unacceptable bell mouth or taper.
- Remove the set plug and repeat the process for the other side of the ring, aiming for a similar fit on both sides.
- Use an internal measuring device or Go/No-Go X-tolerance plain plug gages to confirm the minor diameter of the ring is within tolerance (Go plug enters, No-Go plug doesn’t).
- As a final step, it’s highly recommended to seal the locking and adjustment screw holes with wax to prevent tampering.
Key Takeaways:
- A thread ring set to a specific master plug is unique and cannot be interchanged with other plugs without readjustment.
- This process ensures accurate thread ring functionality and adherence to quality standards.
- Following these steps meticulously will guarantee the ongoing reliability and effectiveness of your thread ring gages.
منبع: https://www.qualitymag.com/articles/97926-setting-thread-rings-for-accurate-quality-checks-a-step-by-step-guide